by Peter Madeley
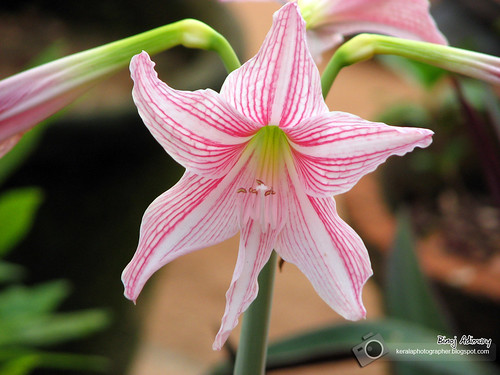
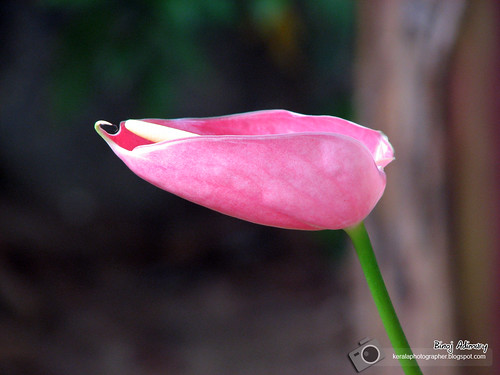
Woven Shadows 7 - Macro Photography

Macro Photography can produce wild and amazing imagery. If you learn how to take great pictures from up close, you can have a lot of fun with it. Woven Shadows 7 contains several ideas to help you improve your techniques in this area.
You can get Woven Shadows 7 here.
Turn a Camera Lens into a Close-Up Lens with Binoculars
Do-it-yourselfer Chris Knight explains that the innards of cheap binoculars can double as a macro lens for digital SLR cameras and camcorders and can prove especially useful in situations when a macro lens is unavailable. Unscrew the binoculars and remove the front lenses. Tape the lenses securely to the front of your camera. When you first start the camera up, it will take some time to acquire the best focus, but with practice, you'll be able to capture objects at extreme close-up detail.
Digital Photography Tips
- Travel Happy have a useful post for digital camera owners wanting to learn How to Put Your Camera Video Clips on YouTube.
- Thomas Hawk has a great post with 10 great Flickr Hacks which I’m sure many of our Flickr using readers will love.
- Photodoto give a DIY tip on how to Build your own 42″x78″ free-standing lighting panel for about $40
- Photo Critic get arty on us describe How to Photograph Smoke.
- Photoshop Roadmap share 5 Easy Ways to Make Money Online with Photoshop
- Better Photo looks at how to Get the Most from a Background.
- PCIN takes an overview look at Lens Flare.
- Photodoto answer a few questions about How to Crop a photo for better composition.
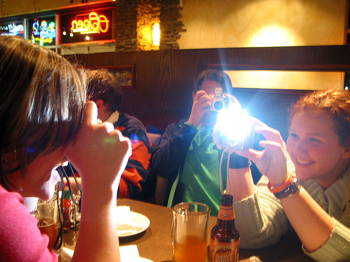
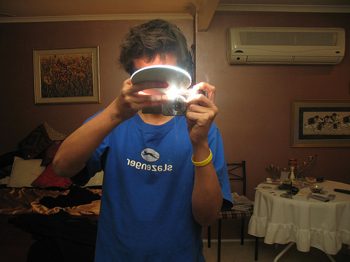
Shooting with an In Camera Flash
Has anyone noticed how there has been a real anti-flash vibe going around recently in the digital photography sphere? I’m seeing it in books, websites, forums and even from manufacturers of cameras themselves with the recent release of loads of cameras that would rather push ISO up very high than use a flash.
While I would totally agree that flash photography can blow out a shot with it’s harsh light - there are times where there’s no getting around using it and where (when used correctly) it can actually ‘make’ a shot.
My preference with flash photography is to have dedicated flash that is either on a hotshoe, flash bracket or off camera - however there are plenty of times when all you’ve got at your disposal is the in camera flash. 99% of all cameras have them - so perhaps it’s time we thought about how to get the best results from them.
Here are a few tips:
1. Get In Close
The main limitation of built in flash units is their power. Whereas external flash units have their own dedicated power source and can be quite large - a built in flash shares it’s power with your camera’s other components and it’s generally quite a bit smaller.
Knowing this should drive you to get in close enough to your subject for the flash to have some impact (usually within 2-3 meters). If you can’t get in close (for example if you’re at a rock concert and are sitting in the back row) you’ll probably achieve better results by turning your flash off and bumping up the ISO setting.
2. Try Slow Sync Flash
Another limitation with in built flash units is that they can produce quite harsh results that mean any other ambient light in a scene is lost. This is partly because the light they produce is unable to be directed/bounced indirectly onto your subject.
One way around this is to use Slow Sync Flash. You can read about this technique in our tutorial on the topic - but in short it involves choosing a slower shutter speed and firing the flash while the shutter is open.
3. Diffuse or Direct Your Flash DIY style
I’ve already alluded to the problem of not being able to diffuse the light produced by a fixed flash unit - however one technique that some inventive photographers use is to take a Do It Yourself approach and create their own diffusers.
Some photographers I know always have a roll of semi-opaque adhesive tape in their camera bag to put over their flash. This doesn’t stop the flash’s light but diffuses it.
Other friends take a little piece of white card with them which they put in front of their flash to bounce it up or sideways.
Using these techniques might mean you need to play with exposure compensation (you’ll probably want to increase exposure by a stop or two) as your camera won’t be aware that you’re taking some of the power out of it’s light.
4. Fill-in Flash
Don’t just use your flash when it’s dark. Often when shooting outdoors a flash can really lift an image up a notch - particularly when photographing a subject with strong backlighting or one with harsh downward light. A fill in flash lights up shadowy areas. Read more about Fill Flash.
Via© Digital Photography School10 Great Flash and Lighting Hacks for Digital Photographers
 Lighting can be the difference between a good shot and a great one.
Walk into most professional photographer’s studios and you’ll be confronted with truckloads of lighting equipment. To the average hobby photographer it’s enough to make your mind boggle - and for your stomach to turn as you think about the cost of it all.
Most of us can’t afford a full lighting rig - however what if there was a way to experiment with the type of lighting gear that pro photographers use without spending too much money? What if you could make it yourself.
In this post I’ve found 10 DIY Flash and Lighting Hacks that put some of these lighting techniques within the grasp of the rest of us. Some are more involved than others but all are fun and will provide you with some new lighting gear to experiment with.
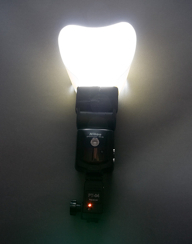
1. Multi-Super-SB-Ring Light
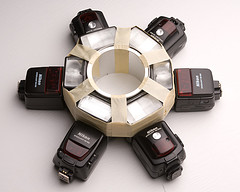 What can you make with six speedlight flashes, a coffee can and a little spare time?
You get a multi-super-sb-ring-light! (pictured left).
You could probably also blind a small village if you’re not careful!
Find out what it is, how to make one and what the results are like here.
This one looks like a lot of fun to play with - even if it’s just for the challenge of it and the looks you’d get when you pull it out next time you do a shoot..
2. Poor Mans Ring Flash
 All you need for this one (pictured left) is a used milk bottle/jug and some scissors.
The result is that you’ll have a Poor Mans Ring Flash.
A ring flash is one that fits around the lens - it creates a wonderfully unique lighting effect. They will usually lighten your wallet by a couple of hundred dollars.
It’s so simple that I whipped one up for myself today in 5 minutes.
It worked out pretty good too - not bad for the cost of a couple of liters of milk!
If you want to experiment with other methods of making DIY ring flashes you also might want to check out this post for another method. This one is a little more involved, but I think will probably get better results.
Subscribe to our newsletter to get more weekly Digital Photography tips like this
3. Inexpensive Light Tent
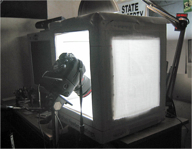 Have you ever wanted to replicate the crisp clean product images that you see in catalogs with the products seemingly floating on a white background?
If you do - you need some kind of light tent/light box.
As usual, light boxes can cost you quite a bit - but thanks to DPS reader Jeffrey Bail you might be able to achieve the results without having to spend much at all.
In our Inexpensive Light Tent tutorial Jeffrey shows you how to turn a box, fabric, tape, glue board and light into a great little light tent.
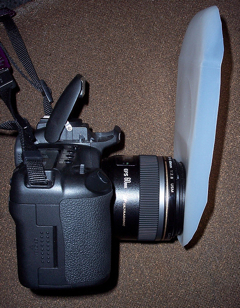
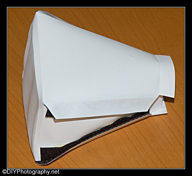
4. Party Bouncer Card
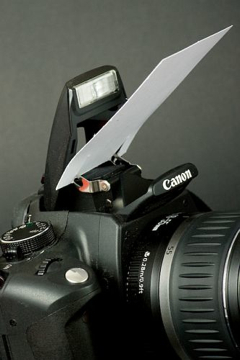 Another cool DIY Hack is this Party Bouncer Card (pictured left) which is so simple yet promises to be so useful and effective.
This one is for those of you with a camera which doesn’t have the capability for an off camera flash.
It allows you to bounce some light off the ceiling while also diffusing the light going forward - this will enable you to get a less harsh flash effect that many flashes leave images with. I like this one as it pushes the light out from your flash in two directions which can lead to a more even light rather than just diffusing it - a little more sophisticated.
Another quick DIY on diffusing a flash is to put a little translucent magic tape over a flash (or a piece of white tissue paper can do it too).
Any of these methods will decrease the amount of light getting out from the flash onto your subject - hopefully resulting in a more subtle light and a less blown out image.
5. Turkey Pan Beauty Dish
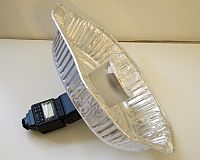 Beauty dishes are wonderful pieces of photographic equipment to experiment with - but they can be very expensive.
Not any more (at lest if you use this DIY trick).
In this hack learn how to use a simple Turkey Pan to get some pretty amazing beauty dish results! The comparison examples in this tutorial between the turkey pan version and the real thing are pretty convincing.
I must remember to add Turkey Pans to this week’s shopping list.
6. DIY Ghetto Flash Extender
 I’d not heard of this type of device before - but since I found this tutorial I’ve discovered a number of photographers who for one reason or another want to be able to extend the reach of their flash.
This is particularly useful for wildlife photographers who want to supplement natural light in tricky lighting with fill flash. Of course sometimes it’s difficult to get close to that animal and a normal flash would have no impact.
Enter the Flash Extender (one popular one is the ‘better beamer’).
Want to make one for yourself? This tutorial for the DIY Ghetto Flash Extender will tell you how.
7. Disposable Camera Flash Slave
 Lately I’ve had more and more questions from readers about how to set up shots with multiple flash units to light a subject from more than one angle.
It’s not difficult to do if you have the budget to buy yourself an extra speedlight flash or two (or more) but if you don’t have the budget is there a way?
In this tutorial and author shows you how to use a disposable camera to act as a remote slave flash.
OK - this tutorial isn’t for anyone looking for a quick simple solution - but it is a challenge that I’m sure some of you will be up for!
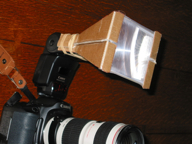
8. Flash Mounted DIY Softbox
 Another way that professional photographers diffuse the light that comes from a flash and gets a nice subtle and even light on their subject is to use a softbox
A softbox sits over a light (it’s a big box with white walls) which ensures the light is spread out evenly.
This DIY Softbox tutorial is great - it requires card, a white sheet (silk if you can), velcro, scissors, glue and the template that the tutorial provides you with.
The results look pretty good - but if you want more DIY softboxes the same site also has another tutorial for an alternative softbox.
Again - this one looks pretty good.
9. Flash Bouncers
 There are a lot of DIY flash diffuser hacks and tutorials around but this one from our friend Chris at DSLRBlog is pretty cool.
It costs £1, takes 5 minutes, requires craft foam, a little elastic and some scissors.
The tutorial even includes a template for you to print out on your printer and then cut out - what more do you need?
Even the technologically challenge could make this one (speaking of myself of course).
Nice work from Chris with that one.
Another similar Flash Bouncer/Diffuser can be found over at DPReview here. This one is foam also.
Lastly - another card/paper version of the flash bouncer.
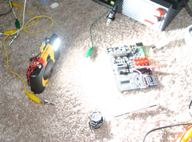
10. Full Budget DIY Lighting Studio
 It’s time for one last DIY lighting hack - this one attempts to bring it all together with a full DIY Budget Studio setup.
The author of it takes up the challenge of creating a full studio lighting system for under $75.
It includes lights, reflectors, diffusers and flash diffusers - all using items that you could pick up at hardware and craft stores.
It also shows you a few test shots at the end of the tutorial that compare different lighting options.
You will need your own flash unit to use the flash diffusers on - but the rest is all included in the tutorial.
I particularly light the suggestions around globes for the lights. I know a couple of DPS forum members have had similar success with these sorts of lights.
Via© Digital Photography School